Volkswagen Touareg Forum banner

Removing the T3 front bumper cover

52K views 28 replies 13 participants last post by  Cass  
#1 · (Edited by Moderator)
Following on from my recent trips I wanted to carry out a deep clean of the front end and reset the plastic trim that hangs below the bumper as some of the plastic trim rivits have popped out.
I followed the manual and also I took some photos as I went along as it should help others if they need to remove the cover.

Some of the instructions say simple things like "using the wedge tool unclip the plastic clips" this often glosses over a technique needed to release some of the clips without breaking them so I will try to articulate what I did at each step.

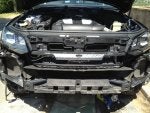
The first step is top open the bonnet and remove the four screws securing the top of the grille using a Torx bit.

Then gently ease the grill forwards so you can look down and see the plastic clips that run along the bottom of the grille so you can see how they attach , I recommend spraying some silicone down ontothe clips to assit in prising them out.
this photo shows the ends of the clips protruding through the bumper cover. To release them you need to insert a wedge tool under the grille into a tiny slot under each clip, ideally if you had enough of the wedge tools you could put one in each and the grille would pull out forwards in one go, but practically I dont so start at one end and pull the end of the grille whilst working your way along one clip at a time until it comes away.


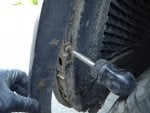
Now remove the four more torx screws along the edge of the bumper cover.

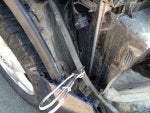
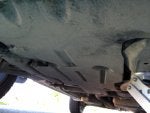
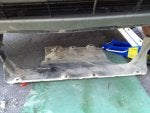
next you need to remove the front sound insulation from under the car. This is held in place by 10 T30 torx screws/ 10mm bolts.


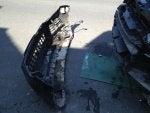
Now remove the screws along the bottom of the bumper cover, 3 larger ones across the centre and 3 smaller ones at each side.


countd.
 

Attachments

#2 · (Edited by Moderator)
Next pull the wheel arch trim away at the bottom and releasing the 2 cips that pull out of the bumper cover, do not remove more wheel arch trim than is needed to reveal the 3 screws holding the liner to the bumper cover.

remove the 3 screws.

repeat on both sides

next we need to remove the the clips holding the top of the bumper cover to the front wing. I recommend spraying some silicone into the gap before you start pulling. There is not much room to insert a wedge and it is not really needed but some gentle force is required to unclip starting from the far right.


With the help of a second mechanic (or in my case Mrs Loz) ask them to hold the released end of the cover whilst you repeat the other side.


You now need to clamp the washer hose and disconnect and also disconnect the multi plug for all the sensors on the cover.


Now you can move the cover away and clean the front of the car including the intercoolers.
 

Attachments

#3 · (Edited by Moderator)
Now the cleaning, removed the 2 x cowls that clip on the front of the intercoolers, they simply move to the outside and come away;


I then cable tied a glove over the multi-connector and put a glove over the air intake.


Now to jetwash the front taking care to use low power on the intercoolers when up close.


Now all nice and clean.


I then cleaned the bumper cover thoroughly including disconnecting and cleaned all connectors for the parking sensors and fog lights with contact cleaner and then a spray of silicone before reconnecting.

The reassembly is a reverse of the above. Remember to spray silicone grease on all the clips and tabs to that they come off easy the next time.

A wash and machine polish later and all is nice and shiny again.
 

Attachments

#4 ·
Good Job Loz
Nice and shiney !
 
#5 · (Edited by Moderator)
Cracking write up and pics Loz - will definately benefit someone in the future
Image
 
#6 ·
Greetings from Canada!
Great job and Great Pics!
This will come in very handy since I purchased some replacement grills from China with some LED inside... I am replacing the 2 air ducts located in the bumper. Tried doing so over the weekend by not removing the bumper but it was not possible.
I installed some backup sensors for him last week and Dad which is 80 was freaking out when he saw the rear of the Treg in pieces... so he did not want me to remove the front bumper but after seeing these instructions, it will help me a lot.
Is there a tool that VW sells to remove those bloody trims?
I keep braking them off!!!

Thanks a bunch.

Eric
 

Attachments

#8 ·
Is there a tool that VW sells to remove those bloody trims?
I keep braking them off!!!
[
Eric
You can purchase trim removal tools made from nylon that are tapered or wedge shaped to ease into the gaps but in any case try hard to get behind, or into the gaps with some silicone spray to help them out.
 
#7 · (Edited by Moderator)
Hi Eric, and welcome to myTreg.com

Please remember to provide some details about your vehicle (year and model are a good start) in your signature as it helps the members answer your questions.

Some tips to make your visit here more enjoyable:

If you haven't, please use the 'search' feature at the top right of the page or use google with; [site:www.mytreg.com <search words>] for your questions as they may have been asked before, please beware that the site search need 4 or more letter words, (no limit with the Google search).

Please post your question once in the appropriate discussion forum appropriate to your model and use the topic title & description to briefly summarise the problem. This will assist others and provide for a quicker response. Be patient and a knowledgeable member or guest will address your question.

New members and guests can use the 'View New Content' link next to the 'Search' link top right of the info bar, as a great way to see all of the posts you have missed since you were last on the forum.

Please feel free to post an introduction in the Introductions Forum and tell us about yourself.

Every member has a gallery area in their profile and we love to see photos of your Touareg in action.

Kind Regards
The Admin Team.
 
#10 ·
Hi ptcz, and welcome to myTreg.com

Please remember to provide some details about your vehicle (year and model are a good start) in your signature as it helps the members answer your questions with model specific issues.

Some tips to make your visit here more enjoyable:

If you haven't, please use the 'search' feature at the top right of the page or use google with; [site:www.mytreg.com <search words>] for your questions as they may have been asked before, please beware that the site search need 4 or more letter words, (no limit with the Google search).

Please post your question once in the appropriate discussion forum appropriate to your model and use the topic title & description to briefly summarise the problem. This will assist others and provide for a quicker response. Be patient and a knowledgeable member or guest will address your question.

New members and guests can use the 'View New Content' link next to the 'Search' link top right of the info bar, as a great way to see all of the posts you have missed since you were last on the forum.

Have a read of this T3 topic as it will familiarise you with common options you will use during the ownership of your vehicle.

Thanks for the good introduction and remember every member has a gallery area in their profile and we do love to see photos of your Touareg in action.

Kind Regards
The Admin Team.
 
#12 · (Edited by Moderator)
Before you replace the horn, try squirting some WD40 or similar penetrating oil up/down the horn trumpet.

Leave it for 24 hours, then take the car somewhere where you won't be a nuisance and lean on the horn button for a long time repeatedly.

Quite often the duff horn will start working again - maybe a squeak or two to start with and then the full blown noise.

Once it is working, make a point of having severe road rage on a regular basis and using the horn extensively to keep it in full voice!
 
#13 ·
Unfortunately you can't do this with the T2 as the horns are well hidden behind the bumper and under the light tray. As the bumper is dead easy to remove though, once off a good squirt etc worked for me and my hunky Treg no longer sounds as though it regularly has sand kicked in its face.
 
#14 ·
[quote name='Loz' timestamp='1370863455' post='118005']

I followed the manual and also I took some photos as I went along as it should help others if they need to remove the cover.

Loz

Where did you get your hands on WS manual for a T3 pls?

James
 
#15 ·
#21 ·
LOZ! your post is amazing, it's like my golden guide, just so you know, your post did the purpose-share your experience! i appreciate that!!!
one question, after I put my bumper back on, my check engine light was on. any idea on that?
Thanks again,
Richie
 
#22 ·
Hi Richie, and welcome.
Not sure why that would be as the only things that get disconnected are the fog lights, front parking sensors and front facing area view camera.
You would need a vcds scan to find out what is generating the warning, what does the display say if you select vehicle status?
 
#24 ·
Free the Alligator ?
 
#25 ·
Is that #freethegator ?
 
#26 ·
Loz, my bumper cover just needs clipping in properly where it meets the wheel arch cover, is it possible to just undo the wheel arch cover to do this without having to do all the other removal first?
 
#27 ·
Try a punch with the palm of your hand first.
Otherwise yes a screw under bottom edge, 2 up the wheel arch liner, and it pulls away gently releasing 2 clips but don't go much beyond the bumper join as the trim clips at the top of the wheel arch are break to release type.